
That moment a new client signs on the dotted line is a huge win. But how often does that initial excitement fizzle out into confusion and buyer's remorse within weeks? The painful truth is that a clunky, disorganized, or silent start can quickly erode trust, leaving your team drowning in repetitive questions while the client wonders if they made the right choice.
The quick win? A simple, automated welcome email that goes out the second the contract is signed. It should contain a link to schedule their kickoff call and attach a one-page "What to Expect" guide. This single action immediately replaces post-sale silence with proactive guidance, reassuring the client they're in capable hands.
This is precisely why mastering a set of client onboarding best practices is not just an operational nicety, it's a strategic imperative. It reduces confusion, builds confidence, and streamlines your internal workflows, freeing your team to focus on delivering high-value work instead of putting out fires.
In this comprehensive guide, we will break down the exact, actionable steps to build a world-class onboarding system. You will learn how to:
Create a structured onboarding timeline and welcome packet.
Conduct comprehensive discovery sessions that uncover true needs.
Establish clear communication protocols and feedback loops.
Ensure a smooth handoff from the sales team to the project team.
By implementing these strategies, you can transform your onboarding from a potential liability into your greatest asset for building lasting, profitable client relationships.
1. Create a Structured Onboarding Timeline
Have you ever started a new client project only to have it descend into chaos, with missed steps, confused expectations, and a client wondering what they’re paying for? The quickest win to prevent this is to map out the entire onboarding journey before it even begins. A structured timeline is one of the most effective client onboarding best practices because it provides a clear, shared roadmap for both your team and your new client, ensuring everyone is aligned from day one.
A structured onboarding timeline is a detailed, sequential plan that outlines every key activity, milestone, and deliverable from the moment a contract is signed through the initial 60-90 days of the relationship. This isn't just an internal document; it's a critical client-facing tool that manages expectations, demonstrates professionalism, and builds early trust by showing you have a proven process.
How to Implement a Structured Onboarding Timeline
To build your own, start by breaking down the initial phase of a typical project into distinct stages. These often follow a natural progression from setup to active implementation and finally to ongoing management.
The following infographic illustrates a common 90-day onboarding structure, highlighting the key phases and objectives for each 30-day interval.
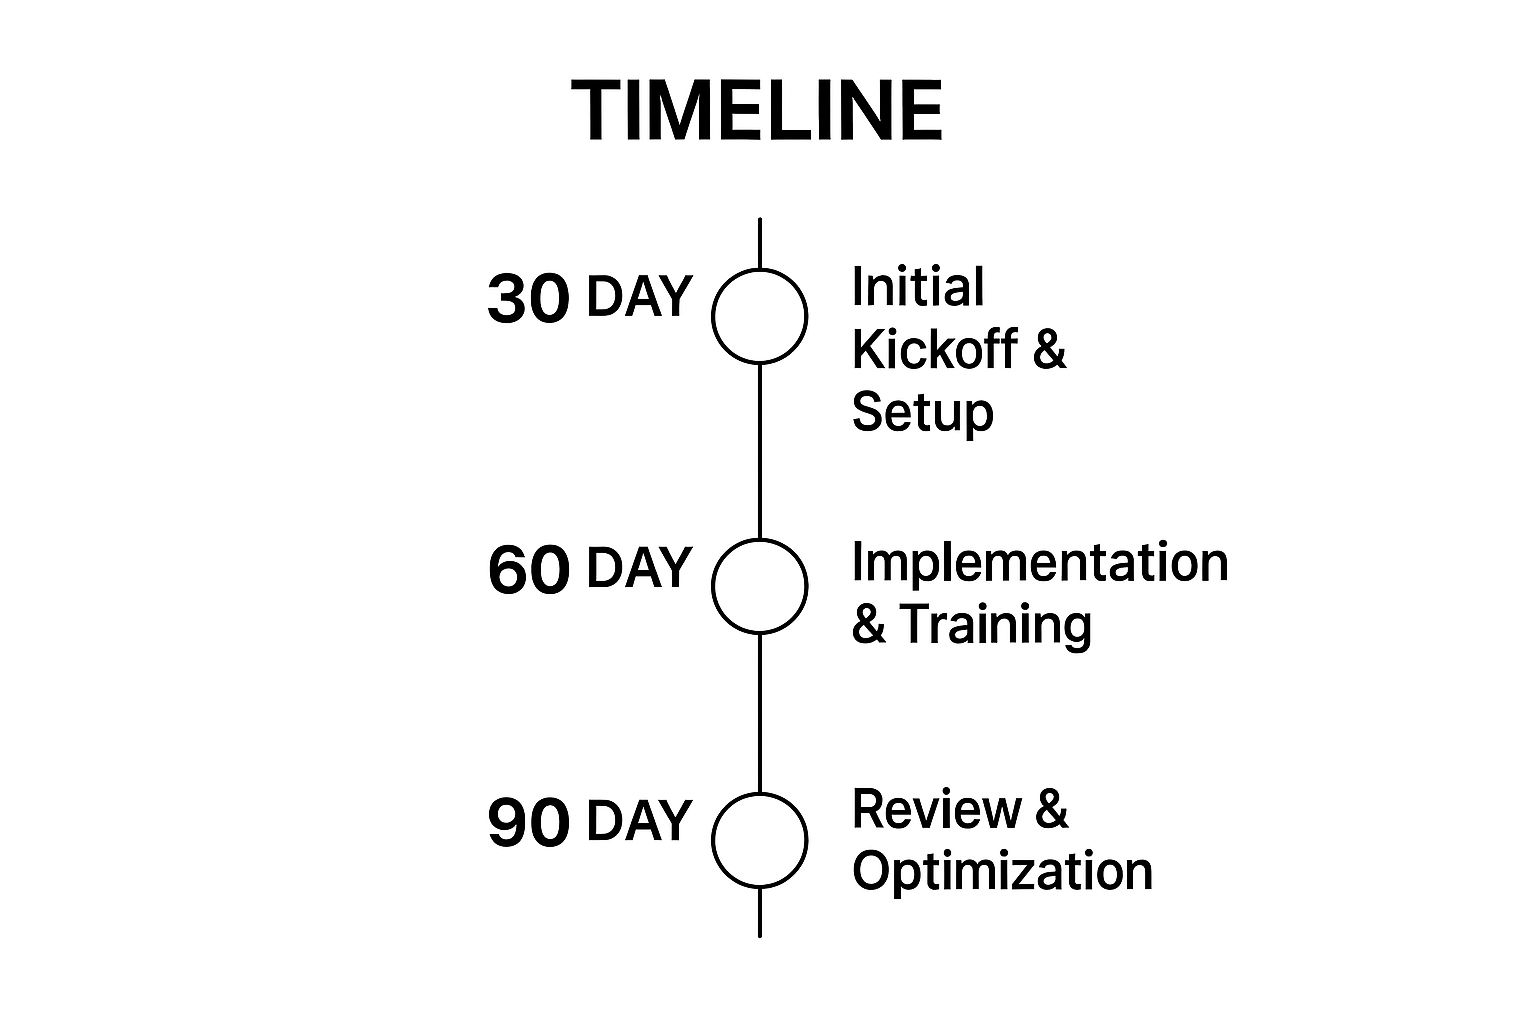
This visual timeline clearly defines the journey's progression, moving the client from foundational setup to active use and strategic refinement, setting clear expectations at each stage.
Here are actionable steps to create your timeline:
Step 1: Define Key Phases: Break the first 90 days into logical phases (e.g., Week 1: Kickoff & Discovery, Weeks 2-4: Setup & Configuration, Weeks 5-8: Implementation & Training, Weeks 9-12: Review & Optimization).
Step 2: List Internal and Client-Facing Tasks: For each phase, list all necessary tasks. Distinguish between tasks your team handles internally (e.g., "set up client in CRM") and those requiring client action (e.g., "provide brand assets").
Step 3: Set Clear Milestones: Assign major milestones to specific dates, such as "Project Kickoff Call Complete" by day 5 or "First Performance Review" on day 90.
Step 4: Build in Buffer Time: Projects rarely go exactly as planned. Add a 10-15% buffer to your timeline for each phase to accommodate unexpected delays or feedback rounds without derailing the entire schedule.
2. Implement a Welcome Packet and Documentation
Ever had a client email you for a login you sent last week or ask about a process that was explained in the kickoff call? This endless back-and-forth drains your team's productivity and can make your new client feel lost and unsupported. A comprehensive welcome packet is a cornerstone of client onboarding best practices, acting as a single source of truth that answers questions before they are even asked.
A client welcome packet is a curated collection of documents and resources delivered to a new client immediately after they sign on. More than just a friendly "hello," it's a strategic tool that sets professional boundaries, clarifies processes, provides essential information, and empowers the client to be a great partner. This proactive documentation drastically reduces repetitive questions and sets a tone of organization and competence from the very beginning.

How to Implement a Welcome Packet and Documentation
Building a comprehensive welcome packet doesn’t have to be a monumental task. Start by creating a master template and then customize it for each client. The goal is to provide everything they need in one organized, easy-to-navigate package.
Here are actionable steps to create your welcome packet:
Step 1: Compile Essential Information: Start with the basics. Include a welcome letter, a "who's who" of your team with contact details and roles, office hours, and preferred communication channels.
Step 2: Outline Processes and Expectations: Clearly document your project process, what you need from the client at each stage (e.g., feedback turnaround times), and how to submit requests or assets.
Step 3: Create a Quick-Start Guide: What are the first three things the client must do? Create a simple, one-page guide to get them started, such as "Step 1: Accept your Slack invite. Step 2: Provide brand assets here. Step 3: Schedule your kickoff call."
Step 4: Develop a Frequently Asked Questions (FAQ) Document: Anticipate common questions about billing, project scope, revisions, and tool usage. Answering them upfront saves everyone time and prevents misunderstandings.
3. Assign a Dedicated Onboarding Specialist
Have you ever felt like you're playing telephone with a new client, where messages get lost as they’re passed between sales, project management, and support? This disconnect often leads to frustration and a disjointed experience for the client. The most direct way to solve this is by assigning a single, dedicated specialist to own the onboarding process, making them the client's trusted guide from start to finish. This is one of the most impactful client onboarding best practices for building strong, long-term relationships.
A dedicated onboarding specialist is a team member whose primary role is to manage the entire initial client journey. They act as a consistent, single point of contact, ensuring nothing falls through the cracks. This approach replaces a confusing, multi-person handoff with a seamless, personalized experience, which is crucial for establishing trust and demonstrating your commitment to the client's success right away.
How to Implement a Dedicated Onboarding Specialist Role
You don't need to be a tech giant to adopt this model. Even a small agency or consultancy can designate a team member to take the lead on new client relationships. The key is to empower this person with the knowledge and authority to guide the process effectively.
Here are actionable steps to create this role in your organization:
Step 1: Define the Role and Responsibilities: Clearly document what the onboarding specialist is responsible for, from conducting the kickoff call to ensuring all initial deliverables are met.
Step 2: Establish a Clear Handoff Protocol: Create a structured process for when and how the onboarding specialist transitions the client to the long-term account manager or support team. This should be a warm handoff, not an abrupt transfer.
Step 3: Provide Comprehensive Training: Ensure your specialist is an expert on your services, processes, and tools. They should be able to answer 90% of a new client's questions without needing to "check with someone else."
Step 4: Create a Backup System: What happens if your specialist is sick or on vacation? Designate a secondary contact or a clear escalation path so the client is never left without support.
4. Conduct Comprehensive Discovery Sessions
Have you ever launched a project thinking you understood the client's needs, only to discover a critical, unmentioned requirement halfway through? This misalignment often stems from surface-level initial conversations. The best way to prevent this is by conducting a deep, structured discovery session, one of the most crucial client onboarding best practices for setting a project up for long-term success.
A comprehensive discovery session is a dedicated meeting (or series of meetings) that goes far beyond a simple Q&A. Its purpose is to uncover the client's true goals, unspoken expectations, internal challenges, and what "success" genuinely looks like to them. This isn't just about gathering information; it's a strategic exercise in empathy and analysis that builds a solid foundation for the entire relationship.
This process starts even before the first call, often with the information gathered from your initial intake. The quality of your initial questions can set the stage for a much deeper discovery conversation. For more on optimizing this first step, you can review best practices for a lead capture form on growlio.io.
How to Implement Comprehensive Discovery Sessions
To make your discovery sessions effective, treat them as a formal, structured part of your onboarding process, not just a casual chat. Prepare a detailed agenda, come with insightful questions, and guide the conversation toward actionable insights. The goal is to move from "what do you want?" to "what problem are you trying to solve?"
Here are actionable steps to conduct a great discovery session:
Step 1: Prepare a Structured Agenda: Create a list of open-ended questions focused on goals, challenges, and success metrics. Group questions into themes like "Business Objectives," "Target Audience," "Previous Attempts," and "Key Stakeholders."
Step 2: Involve the Right People: Insist on having all key decision-makers and stakeholders in the room. Hearing different perspectives from marketing, sales, and operations can reveal critical internal dynamics and priorities.
Step 3: Document and Validate: Take detailed notes and organize them into a "Discovery Findings" document. Share this summary with the client for review and approval to ensure you're both on the same page before any work begins.
Step 4: Use Insights to Customize Onboarding: Use what you learned to tailor the rest of the onboarding process. For example, if you discover the client is not tech-savvy, you might schedule extra training sessions.
5. Establish Clear Communication Protocols
Have you ever found yourself drowning in a sea of client emails, Slack messages, and unscheduled "quick calls," unsure which conversation holds the most recent decision? This communication chaos is a fast track to missed deadlines and client frustration. The most powerful way to prevent this is by establishing clear communication protocols from the very start, a critical client onboarding best practice that replaces ambiguity with clarity.
A communication protocol is a predefined framework that dictates how, when, and through what channels you and your client will interact. It’s not about being rigid; it’s about being reliable. This framework covers everything from scheduled meeting cadences and reporting formats to preferred communication tools and emergency contact procedures, ensuring every interaction is purposeful and efficient.
How to Implement Clear Communication Protocols
Building your own communication protocol involves a proactive discussion with your client to set mutual expectations. It’s a collaborative process that respects both your team’s workflow and the client’s preferences, building a foundation of professional respect.
Here are actionable steps to create your protocol:
Step 1: Ask About Preferences: During the kickoff call, ask your client, "What is your preferred way to communicate for day-to-day questions versus urgent issues?" This shows respect for their style and helps you adapt.
Step 2: Define Channels and Purpose: Clearly state which tool is for what. For example, "We'll use Slack for quick questions, email for official sign-offs, and our project management tool for all deliverable feedback."
Step 3: Set a Meeting Cadence: Schedule recurring meetings in advance. Propose a structure like, "Let's plan for a 30-minute check-in call every Tuesday at 10 AM to review progress and address blockers."
Step 4: Establish Response Times: Manage expectations by setting a clear Service Level Agreement (SLA). For instance, "Our team will respond to all non-urgent inquiries within 24 business hours."
Step 5: Document and Share: Put all of these agreed-upon rules into a simple document or a dedicated section in your client portal. This written record serves as a reference point for both teams throughout the project lifecycle. To learn more about how a centralized system can support this, you can explore the benefits of a customer relationship management platform.
6. Provide Comprehensive Training and Education
Have you ever handed over a final deliverable or launched a new system for a client, only for them to immediately bombard you with basic questions, revealing they have no idea how to use it? This creates endless support tickets and undermines the value you provided. The most effective way to prevent this is by integrating comprehensive training into your onboarding, empowering clients to become self-sufficient experts with your solution.
Providing comprehensive training and education is a cornerstone of modern client onboarding best practices, especially for complex products or services. It involves developing structured educational programs that ensure clients fully understand how to use your deliverables, products, or processes. This goes beyond a simple handover call; it’s about building their confidence and competence, which is critical for long-term success and client satisfaction.
The video below offers valuable insights into creating a customer education program that scales, covering foundational strategies that can be applied to any business.
A well-structured training plan ensures clients feel supported and capable, turning them into advocates for your brand.
Pro Tip: The “Show One, Do One, Teach One” Method
Don’t just show your client how to do something; make it stick.
Show One: In a live session, demonstrate a key task yourself (e.g., how to update content on their new website).
Do One: Have the client share their screen and walk them through performing the same task while you guide them.
Teach One (Optional but powerful): Ask the client to explain the process back to you in their own words. This solidifies their understanding and reveals any remaining gaps.
How to Implement Comprehensive Client Training
Building a client education program doesn't have to be resource-intensive. The key is to make learning accessible, relevant, and ongoing. Start by identifying the core skills a client needs to succeed and build your training materials around them.
Here are actionable steps to create your training program:
Step 1: Assess Client Skill Levels Early: Use a simple survey or questionnaire during the kickoff phase to gauge your client's existing knowledge and technical comfort. This helps you tailor the training to their specific needs.
Step 2: Offer Multiple Training Formats: Cater to different learning styles by providing a mix of formats. This could include live one-on-one or group webinars, pre-recorded video tutorials, detailed written guides with screenshots, and interactive Q&A sessions.
Step 3: Focus on Real-World Scenarios: Base your training on practical, real-world examples relevant to the client's business goals. Instead of just explaining a feature, show them how to use it to solve a problem they actually have.
Step 4: Create a Self-Service Knowledge Base: Compile all your training materials into a centralized, easy-to-navigate resource hub (using a tool like Notion, a private section of your website, or a dedicated platform like Help Scout). This empowers clients to find answers on their own, 24/7.
7. Implement Feedback Collection and Iteration
Have you ever completed an onboarding process feeling confident, only to discover weeks later that your client was confused or unsatisfied about a key step? Waiting until a project sours to ask for feedback is a recipe for churn. The most proactive way to prevent this is to build systematic feedback loops directly into the onboarding process, turning a potential blind spot into a powerful tool for improvement and relationship building.
Implementing feedback collection and iteration is one of the most crucial client onboarding best practices because it transforms your process from a static checklist into a dynamic, client-centric system. It involves establishing scheduled, intentional moments to ask for client input, actively listening to their experience, and using those insights to refine not only their current journey but the onboarding process for all future clients. This demonstrates that you value their partnership and are committed to excellence.
Real-World Mini Case Study: Slack’s User Onboarding Flow
When you create a new Slack workspace, the platform doesn't just dump you into an empty channel. It uses a clever, interactive onboarding process. The “Slackbot” guides you through key first steps, like inviting teammates and creating your first channel. After each major action, it asks a simple, contextual question, like "Was that helpful?". This micro-feedback loop allows Slack to gather millions of data points on user friction, which they use to constantly A/B test and refine the onboarding UI. This approach has been instrumental in making a powerful tool feel intuitive, driving its massive adoption rate.
How to Implement Feedback Collection and Iteration
To build an effective feedback loop, you need to be intentional about when and how you ask for input. Don't just send a generic "how are we doing?" survey at the end. Instead, strategically place your feedback requests at critical transition points in the onboarding journey.
Here are actionable steps to create your feedback system:
Step 1: Use Multiple Collection Methods: Combine different approaches for a complete picture. Use quick pulse checks via email after key meetings, short formal surveys (3-5 questions) at the end of major phases, and an in-depth review call at the conclusion of the 90-day onboarding period.
Step 2: Ask Specific, Actionable Questions: Avoid vague questions. Instead of "Are you happy?", ask "How would you rate the clarity of our project kickoff call?" or "Was the process for providing brand assets straightforward?". This gives you precise data you can act on. For a deeper understanding of client needs, you can find more strategies on the growlio blog.
Step 3: "Close the Loop" with Clients: This is the most critical step. When a client provides feedback, acknowledge it and let them know how you plan to use it. For example, "Thanks for pointing out the confusion around accessing the project folder. We've now added a direct link to our welcome email." This shows you're listening and makes clients more willing to offer feedback in the future.
Step 4: Track Feedback Trends Over Time: Don't let feedback live and die in an inbox. Log responses in a simple spreadsheet or your CRM to identify recurring themes. If multiple clients mention that the technical setup phase is confusing, you've pinpointed a systemic issue that needs to be fixed in your process.
8. Create a Smooth Handoff to Ongoing Support
Have you ever meticulously onboarded a client, only for them to feel abandoned or confused when they transition to your long-term support or account management team? The relationship you built can quickly sour if the handoff is fumbled. One of the most critical client onboarding best practices for long-term retention is designing a seamless transition from the onboarding team to the ongoing support team.
A smooth handoff is a structured process that ensures a complete transfer of knowledge, context, and relationship management from the initial onboarding specialists to the team responsible for the client's day-to-day success. It prevents clients from having to repeat themselves, re-explain their goals, or feel like they are starting over. This continuity is essential for maintaining momentum and delivering consistent service quality.
How to Implement a Smooth Handoff Process
To build your own handoff process, focus on bridging the gap between the end of onboarding and the beginning of the "business as usual" phase. The goal is to make the transition feel like a natural, positive step in the client's journey, not an abrupt change. This process solidifies the value you've created and sets the stage for a successful long-term partnership.
Here are actionable steps to create your smooth handoff process:
Step 1: Introduce the Ongoing Team Early: Don't wait until the last minute. Introduce the long-term account manager or support lead during the later stages of onboarding. Have them join the final check-in call to create a familiar face and a warm connection.
Step 2: Create a Comprehensive Handoff Document: This internal document is non-negotiable. It should include the client’s original goals, key stakeholders, communication history, technical configurations, any unique challenges encountered, and their "first win" achieved during onboarding. Here's a screenshot of what a simple handoff template in a tool like growlio might look like:
Step 3: Schedule an Overlap Period: If possible, have a brief period where both the onboarding specialist and the ongoing account manager are accessible to the client. This one-to-two-week overlap acts as a safety net, ensuring no questions fall through the cracks.
Step 4: Gather Feedback on the Handoff: After the transition is complete, send the client a short survey asking about their handoff experience. This feedback is invaluable for refining your process and is another powerful client onboarding best practice that shows you care about their entire journey.
Client Onboarding Best Practices Comparison
Onboarding Strategy | Implementation Complexity 🔄 | Resource Requirements ⚡ | Expected Outcomes 📊 | Ideal Use Cases 💡 | Key Advantages ⭐ |
|---|---|---|---|---|---|
Create a Structured Onboarding Timeline | Medium to High: Requires initial setup and regular updates | Moderate: Project management tools and planning resources | High: Clear milestones, accountability, consistent process | Suitable for SaaS, project-based or milestone-driven engagements | Reduces confusion; improves transparency and planning |
Implement Welcome Packet and Documentation | Low to Medium: Creation of materials and periodic updates | Moderate: Content creation, design, translation resources | Medium: Sets professional tone, reduces client questions | Ideal for new client initiation in professional services and SaaS | Professional first impression; ongoing client reference |
Assign Dedicated Onboarding Specialist | High: Needs trained personnel with authority | High: Staffing and ongoing specialist training | High: Strong relationships, consistent communication | Best for enterprise clients, complex onboarding needs | Builds client trust; single point of contact |
Conduct Comprehensive Discovery Sessions | Medium to High: Requires facilitation skill and preparation | Moderate to High: Time from multiple stakeholders | High: Customized onboarding, aligned expectations | Complex projects requiring deep client understanding | Enables tailored service; early issue identification |
Establish Clear Communication Protocols | Medium: Define schedules, channels, and escalation paths | Low to Moderate: Tools for communication management | Medium to High: Better collaboration and issue resolution | All client engagements needing structured communication | Prevents misunderstandings; enforces accountability |
Provide Comprehensive Training and Education | Medium to High: Develop various formats and materials | High: Training creation, delivery, and maintenance | High: Increased client competence and reduced support | Software implementations, technical products | Builds client autonomy; long-term retention |
Implement Feedback Collection and Iteration | Medium: Setup feedback loops and analysis processes | Moderate: Tools and time for surveys and reviews | High: Continuous improvement and client satisfaction | Organizations focused on iterative service improvements | Data-driven enhancements; strengthens client relations |
Create Smooth Handoff to Ongoing Support | Medium: Coordinated procedures and documentation | Moderate: Cross-team collaboration and overlap | High: Continuity and stable ongoing support | Enterprises requiring seamless transitions post-onboarding | Maintains trust; ensures knowledge transfer |
Ready to Build Your Perfect Onboarding Machine?
Moving from chaotic, ad-hoc onboarding to a structured, repeatable system isn't just a "nice-to-have" administrative update. It's a fundamental shift in how you build client relationships and a powerful engine for long-term retention and growth. As we've explored, implementing robust client onboarding best practices is the single most effective way to start a project on the right foot, eliminate scope creep, and transform new buyers into enthusiastic, long-term partners.
The journey from a signed contract to a fully engaged client is filled with potential pitfalls: misaligned expectations, lost information, and confusing communication channels. However, by adopting the strategies outlined in this guide, you can proactively navigate these challenges and create an experience that consistently impresses.
From Theory to Action: Your Onboarding Blueprint
Recapping our key pillars, a world-class onboarding process is built on a foundation of clarity, communication, and proactivity. Let's distill the most crucial takeaways to help you begin this transformation immediately.
Structure is Your Strongest Ally: A haphazard start breeds chaos. Your first and most impactful action is to map out a Structured Onboarding Timeline (Step 1) and bundle all essential information into a comprehensive Welcome Packet (Step 2). This immediately signals professionalism and sets clear expectations, preventing the dreaded "what's next?" email from ever being sent.
Communication Must Be Intentional: Don't let communication just happen. You must design it. By establishing Clear Communication Protocols (Step 5), including defined channels, response times, and meeting cadences, you build a framework of trust and reliability. This proactive approach, combined with Comprehensive Discovery Sessions (Step 4), ensures everyone is aligned from the very beginning.
Empowerment Drives Partnership: Onboarding is not something you do to a client; it's something you do with them. Providing Comprehensive Training and Education (Step 6) on your processes and tools empowers them to be better partners. Similarly, creating a systematic way to Implement Feedback Collection (Step 7) shows that you value their perspective and are committed to continuous improvement. This turns a transactional service into a collaborative partnership.
The True ROI of a Flawless First Impression
Investing time and resources into refining these client onboarding best practices delivers a return far beyond a simple feel-good moment. It directly impacts your bottom line by:
Reducing Client Churn: A positive onboarding experience is directly correlated with higher client satisfaction and long-term loyalty.
Increasing Project Profitability: Clear scope, established boundaries, and efficient communication minimize unbillable hours spent on revisions and misunderstandings.
Generating More Referrals: Happy, impressed clients become your most effective marketing channel, referring new business without you even having to ask.
Improving Team Morale: When your team has a clear, efficient process to follow, they feel less stressed, more confident, and better equipped to do their best work.
The ultimate goal is to make your client feel seen, heard, and confident in their decision to hire you. Every step, from the initial welcome email to the final handoff to your support team, is an opportunity to reinforce that they made the right choice. It's time to stop leaving that first impression to chance and start architecting an onboarding experience that systematically builds trust, demonstrates value, and sets the stage for a successful, long-lasting partnership.
Tired of juggling spreadsheets, scattered emails, and manual checklists to onboard your clients? growlio centralizes your entire process, from welcome packets to task management and progress tracking, into one seamless platform. Start building your perfect onboarding machine today with a free growlio account and give every client the five-star experience they deserve.